What is Drypoint Printing?
Drypoint is an intaglio printmaking technique where a sharp needle or stylus is used to scratch lines directly into a metal plate, typically copper or zinc. Unlike etching, which uses acid to bite into the plate, drypoint relies on the physical force of the tool to create grooves and raised “burrs” along the edges of the lines. These burrs trap ink, producing characteristic soft, velvety lines and rich tonal effects in the final print. The process is direct and spontaneous, allowing for expressive, sketch-like qualities, but the burrs wear down quickly during printing, limiting editions to around 10-50 impressions before the plate degrades.
History of Drypoint
Drypoint emerged in the 15th century as part of the broader development of intaglio printing in Europe. It was first popularized by German artist Albrecht Dürer, who used it alongside engraving. The technique gained prominence in the 17th century through Dutch master Rembrandt van Rijn, who often combined drypoint with etching to achieve dramatic light and shadow effects, creating evolving “states” of prints as the plate wore. In the 19th and 20th centuries, artists like James McNeill Whistler, Pablo Picasso, and Max Beckmann experimented with it for its immediacy. Contemporary practitioners, such as Louise Bourgeois, Vija Celmins, William Kentridge, and Richard Spare, continue to explore drypoint for its tactile and expressive potential.
The Drypoint Process
- Prepare the Plate: Start with a polished metal plate (copper is traditional for its softness).
- Draw the Design: Use a drypoint needle to incise lines into the plate. The pressure creates burrs that hold ink.
- Inking: Apply ink to the plate, working it into the grooves. Wipe away excess ink from the surface, leaving it in the incisions and burrs.
- Printing: Place dampened paper over the inked plate and run it through a printing press. The pressure transfers the ink to the paper.
- Editioning: Due to burr wear, drypoint editions are small. Artists may create multiple “states” by reworking the plate.
The technique allows for fine detail and tonal variation but requires careful handling to preserve the delicate burrs.
Materials Needed
- Plate: Copper, zinc, or acrylic (for modern, non-toxic variations).
- Tools: Drypoint needle (or etching needle), scraper, burnisher for corrections.
- Ink: Oil-based intaglio ink.
- Paper: High-quality, absorbent printmaking paper (e.g., BFK Rives).
- Press: Etching press for even pressure.
- Other: Tarlatan cloth for wiping, gloves, and solvents for cleanup.
Modern adaptations include using acrylic plates for safer, easier classroom use.
Famous Artists and Examples
Drypoint has been employed by many renowned artists for its intimate, drawing-like quality. Here are some notable examples:
- Rembrandt van Rijn (1606-1669): A pioneer in combining drypoint with etching. His “Christ Preaching (The Hundred Guilder Print)” (c. 1648) showcases dramatic chiaroscuro and narrative depth.

- Albrecht Dürer (1471-1528): Early adopter; works like his engravings influenced drypoint’s development.
- Pablo Picasso (1881-1973): Used drypoint in his expressive portraits and figures during the 20th century.
- Hertha Kluge-Pott (1934-2025): Australian printmaker known for landscape-inspired works. “Guardian” (2003) is a drypoint print in black ink with plate tone, evoking turbulent coastal flora near Cape Bridgewater, Victoria. Edition 11/12, printed on BFK Rives paper.
- David Fairbairn (b. 1949): Contemporary Australian artist. “Auto Portrait No. 20” (2017) is an etching and drypoint self-portrait exploring time, interruptions, and figurative traditions inspired by Goya and Giacometti. Image size: 33 x 28 cm.
- Other contemporaries: Louise Bourgeois’ abstract forms, Vija Celmins’ detailed seascapes, and Ernst Ludwig Kirchner’s expressive figures.
For more inspiration, view these classic drypoint examples:
Simple Drypoint Examples for Beginners and HSC Students
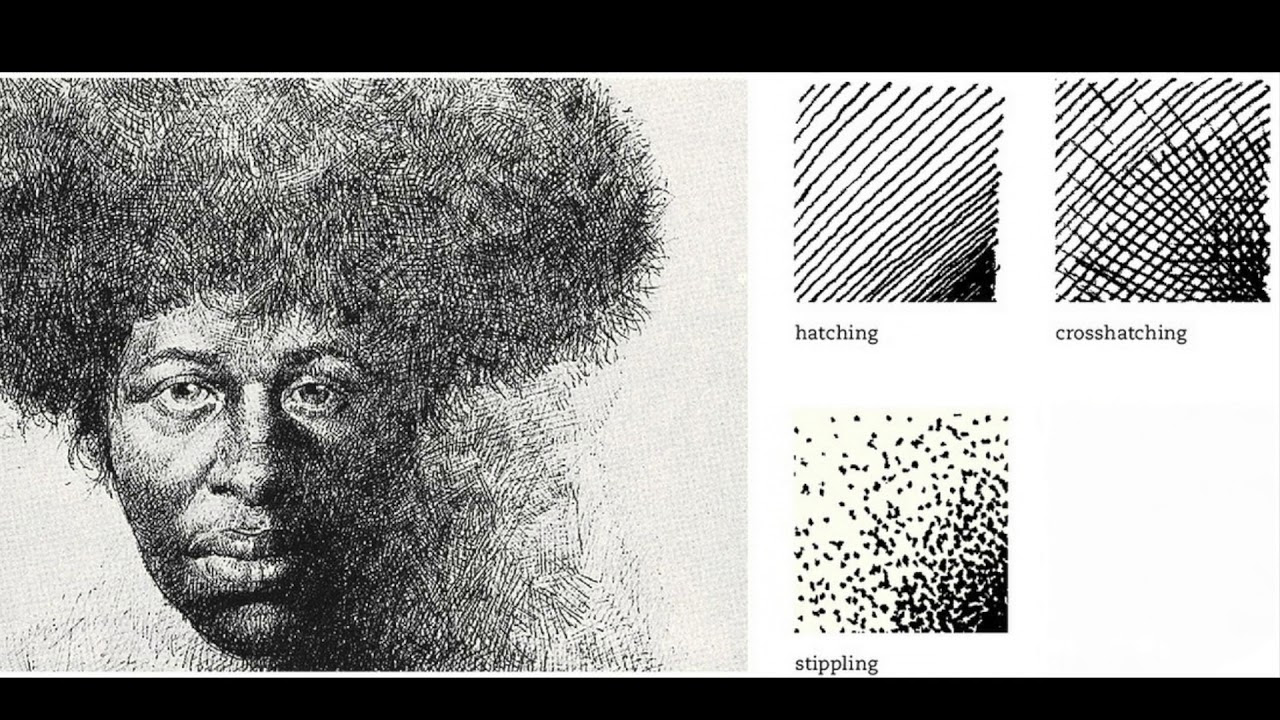
For HSC-level teaching, focus on accessible subjects that build confidence in line work and shading. A self-portrait demonstrating hatching techniques is a great starting point, as it teaches tonal gradation through simple marks.
Conceptual pieces, like a hand holding a cityscape, encourage storytelling with basic forms and textures, perfect for exploring environmental themes in class.

Group portraits or faces allow practice in proportion and expression, using cross-hatching for depth without advanced details.

Drypoint Printmaking in Middle School
Animal subjects, such as a swan, introduce fluid lines and negative space, adaptable for recycled materials like cardboard in school settings.

These examples highlight how drypoint can be taught progressively, starting from sketches to final prints, fostering creativity in young artists.
Preparation Options for Teachers Attending Training
To make the most of the drypoint printing session at Sydney Art School, we encourage teachers to come prepared. Below are options based on recommendations from Peter Mackie, allowing flexibility for different levels of readiness:
- Research Drypoint Examples: Explore works by other artists to inspire your approach. Recommended starting points:
- Hertha Kluge-Pott’s “Guardian” (2003): https://www.artgallery.nsw.
gov.au/collection/works/292. 2015/ - David Fairbairn’s “Auto Portrait No. 20” (2017): https://www.printcouncil.org.
au/product/david-fairbairn- auto-portrait-no-20/ - Search for additional examples by artists like Rembrandt or Pablo Picasso for historical context.
- Hertha Kluge-Pott’s “Guardian” (2003): https://www.artgallery.nsw.
- Prepare a Drawing: Create a preparatory drawing suitable for transfer to an acrylic drypoint matrix. Aim for a finished print size of 200 x 250 mm. This will allow you to focus on the printing process during the session.
- Optional: Prepared Matrix: If you wish, arrive with a pre-scratched drypoint matrix (on acrylic or metal) ready for inking and printing. This can accelerate your hands-on experience and let you experiment with editions right away.
These steps will enhance your engagement and help tailor the training to your needs. If you have questions, contact us at Sydney Art School!